Build Your First CLI
Wade HuangIf you are a developer, you should be some how or familiar with command-line user interface(cli) because a lot of tools provide CLI such git, npm-cli, python-cli, dotnet-cli, aws-cli and more. CLI tools have many advantages than GUI tools like launch easily, development easily and cross-platform easily. Cli tool is good for you at some scenarios, for example, csv files import, batch jobs or schedule jobs. Therefore, this blog-post will show you a easy way to build a cross-platform CLI tool.
I use Nodejs to build the CLI tool. There are 3 benefits:
- Nodejs is cross-platform, CLI tools can be run on Windows, Mac and Linux.
- Easy to distribution. You can publish the cli tool to NPM or just make a package to install privately.
- Easy to build. Only few lines, the project can be turned to a CLI tool.
Requirement
Try this command to see your computer has nodejs installed.
node --version
You can go to Nodejs to install it if you haven’t installed on your computer.
Hello World
Let’s start an easiest example.
Initialization
mkdir build-cli-example
cd build-cli-example
npm init --yes
Those commands will create a package.json.
Add bin in ./package.json
{
  "name": "build-cli-example",
  "version": "1.0.0",
  "description": "",
  "main": "index.js",
  "scripts": {
    "test": "echo \"Error: no test specified\" && exit 1"
  },
  "keywords": [],
  "author": "",
  "license": "ISC",
  "bin":{
    "my-cli" : "./my-cli"
  }
}
bin is the command name and we named it my-cli. Its value is a file like below.
Add ./my-cli file
#!/usr/bin/env node
require("./index.js")
The first line tells NPM what kind of environment the file is. It is very important because without this line. NPM cannot generate bin files correctly.
The other lines are regular Nodejs code. There just calls ./index.js.
Add ./index.js file
console.log("hello would")
For our first step, we just print the greeting word.
Pack, Install and Test
npm pack
npm install -g build-cli-example-1.0.0.tgz
my-cli
The Execution Result

when you run
npm install -g build-cli-example-1.0.0.tgzto install the package, npm will generatemy-cli(sh file) andmy-cli.cmdin the npm file. Because the npm file is inPATH, so when we typemy-cli. The OS can findmy-clito execute.
Parameter Parser
The really CLI tool usually can allow users input some parameters to change its behaviors. You can use process.argv to get input parameters and parse them, but don’t build your own wheels if there are many parsers you can use. I recommend command-line-args, it is a very good parameter parser.
Install command-line-args
npm install --save command-line-args
New ./index.js
const commandLineArgs = require('command-line-args')

const optionDefinitions = [
    { name: 'env', alias: "e", type: String, defaultValue: "local" },
    { name: 'files', alias: "t", type: String, multiple: true },
    { name: 'help', alias: "h", type: Boolean },
    { name: 'new', alias: "n", type: Boolean },
    { name: 'size', alias: "s", type: Number, defaultValue: 100 }
]

const options = commandLineArgs(optionDefinitions, { partial: true });

if (options.help || options._unknown) {
    if (options._unknown) {
        console.log("Unknown options:", options._unknown);
    }

    // TODO:Print Help
} else {
    // Do some jobs
}
The command-line-args is straight forward to use, you can see command-line-args for complete information.
Test
my-cli -e qa --files ./a.txt ./b.txt
Print Help
One thing I complain command-line-args is that its usage generation is separated to another package command-line-usage. So you have to define parser and usage on the different place.
Install command-line-usage
npm install -S command-line-usage
Replace TODO
const usage = require('command-line-usage');

const sections = [
    {
        header: 'My CLI',
        content: 'description'
    },
    {
        header: 'Options',
        optionList: [
            {
                name: 'new',
                alias: "n"
            },
            {
                name: 'size',
                alias: "s",
                description: 'Batch Size, default is 100'
            },
            {
                name: 'files',
                alias: "f",
                multiple: true,
                typeLabel: '[underline]{file} ...'
            },
            {
                name: 'env',
                alias: "e",
                description: 'Environment, default is local'
            },
            {
                name: 'help',
                alias: "h",
                description: 'Print the usage guide'
            }
        ]
    },
    {
        header: 'Examples',
        content: [
            {
                desc: "env",
                example: "my-cli --env dev"
            },
            {
                desc: "files",
                example: "my-cli --files a.txt b.txt"
            }
        ]
    },
]

console.log(usage(sections))
you can see command-line-args for complete information.
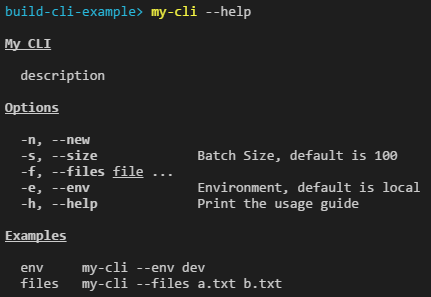
Test
Run npm pack and npm install -g as below to reinstall the package.
my-cli --help

Summary
This is the Source Code of this example. You can see only few lines for building a CLI tool.