Get Started With Android Things
Wade HuangNowadays, IoT (Internet of Things) has become a popular, treading topic. I have seen a lot of videos on Youtude. So it really lures my interests. So I started to learn and play around it. Also, share what I learn to everyone.
What is Android Things?
Android Things is Google’s Solution for IoT. It is a modified version of Android. Smaller and less features, so it can be installed on low-cost devices such as Raspberry Pi. The benefits of Android Things are the development experience and ecosystem. Developing Android Things apps is the same as developing Android Apps. If you currently are an Android Developer. The learning curve for Android Things can be short. It really leverages the value of learning Android.
Requirements
Before we start, there are some requirements you have to prepare.
- Latest version of Android Studio
- Raspberry Pi 3
- you might need keyboard, mouse and monitor to connect Raspberry Pi
- In this article, I will write an example code for switch a LED light, so it is better to have a breadboard and LED kit
- You also need a micro SD to install Android OS on it.
Install Android Things OS
Go to Android Things Console to download Android Things Setup Utilities. This tool help you download Android Things Images and flush images into SD cards.
Follow the setup utilities guidelines, it should not have terrible for install Android Things OS.
Setup WiFi
Android Things Setup Utilities can setup WiFi for your devices, but it requires devices have connection by physical ethernet cable. It looks a old school method. Another way to setup is go to its network setting screen to setup Wifi directly, this method requires montior, keyboard and mouse plug in to the devices.
Peripheral IO
The special thing of Android Things is that it has Peripheral IO API, like control GPIO.
see this document for more information
Make a circuit
In order to test Peripheral IO APIs, we have to make a circuit first. This is our first tutorial, so let us just try a simple circuit as the diagram below.
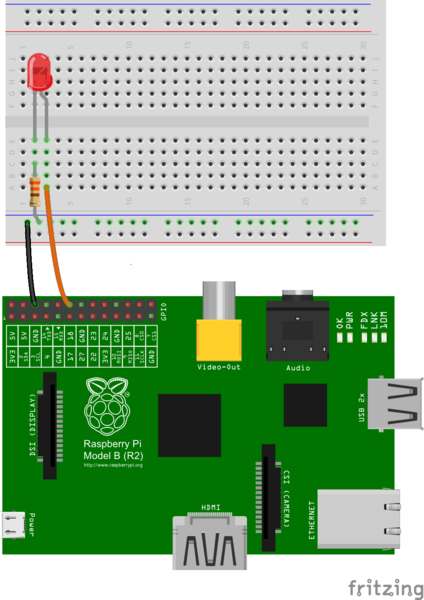
see this tutorial for more details.
ADB Connect
The easiest way of connecting your PC and the IoT devices is ADB over WiFi.
adb connect <the ip address of the devices>
Example Code
Add a Permission
This example app needs access GPIO (general purpose input and output) which is a part of PERIPHERAL IO API, so we have to add permisson for com.google.android.things.permission.USE_PERIPHERAL_IO in AndroidManifest.xml.
<uses-permission android:name="com.google.android.things.permission.USE_PERIPHERAL_IO" />
Add a Swtich
Add a swtich, so we can use this switch as User Interface to contral the value of a GPIO
<Switch
        android:id="@+id/ledSwitch"
        android:layout_width="wrap_content"
        android:layout_height="wrap_content"
        android:text="LED Switch" />
Control a GPIO
private const val LED_PIN_NAME = "BCM18" // !!! Change to the pin name you use.

class MainActivity : Activity() {
    private lateinit var ledGpio: Gpio = null
    private lateinit var ledSwitch: Switch

    override fun onCreate(savedInstanceState: Bundle?) {
        super.onCreate(savedInstanceState)
        setContentView(R.layout.activity_main)

        ledSwitch = findViewById(R.id.ledSwitch)

        // get PeripheralManager
        val manager = PeripheralManager.getInstance()

        // Open GPIO
        ledGpio = manager.openGpio(LED_PIN_NAME)

        ledGpio.setDirection(Gpio.DIRECTION_OUT_INITIALLY_LOW)

        ledSwitch.setOnCheckedChangeListener { _, isChecked ->
            // the GPIO value based on the check status of the switch
            ledGpio.value = isChecked
        }
    }

    override fun onDestroy() {
        super.onDestroy()

        // Close the GPIO
        ledGpio.close()
    }
}
Run
Now hit the run button, select the device. Android Studio starts to build an APK. and uses adb install command to install APK on the device.